Language selection: Choose a language, then click Next.

Multimedia screen setting: Select “Manual setting”, then click Next.

Multimedia screen name: Enter a name for the screen, then click Next.

Network settings: Choose “Ethernet” then click Next

Main switch : Choose “Activate”, then click Next.

Clone multimedia files internally: Select “USB storage memory” then click on Next

Android mode settings
When the screen starts up, press “HOME” and then enter the number sequence 1668 on the remote control.

After this procedure, the display should show :

For all the installations below, make sure that all the installation files (*.apk) are present on your USB key. You can then launch them from the storage folder.
Installing TeamViewer
Please note: This application works with 42UHS-B3AG, 52UHS-B3AG and 02MIS-B1AG screens.
- Download theapk: https://download.teamviewer.com/download/TeamViewerHost.apk
- Install with EXTENSION (Authorize to install)
- Click Open at the end of installation
- Enter account information: E-mail: support@emity.io Password: weged1A@
- Assign, Emity receives a confirmation e-mail and you must wait 5 minutes before continuing. Each device must be validated by our support team before being added.
If validation does not work, please contact our support team at support@emity.io.
E-Box installation
- Launch the Androidapk to install the software,
- At the end of the installation, press OK to avoid launching the software.
E-Switch installation
- Launch the Androidapk to install the software. ( Settings in android mode )
- At the end of the installation, press OK to avoid launching the software.
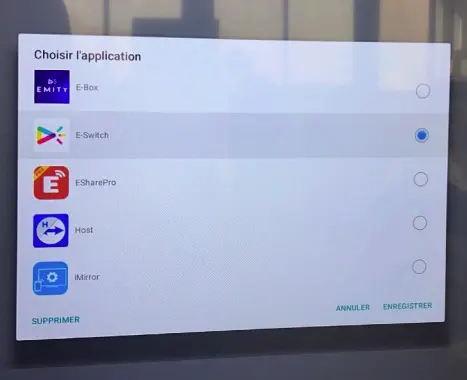
- Go to the Android menu(HOME + 1668): ” Settings ” then ” Multimedia Screen “. Select ” Source settings ” then ” Customize application“.

- Select “E-SWITCH” and save.

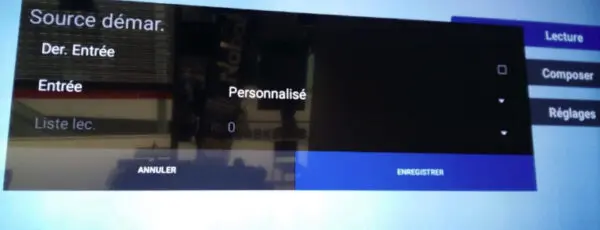
Finally, press HOME and select “Configuration 1”. Select “Start source”.
Click on “Enter” and select “Custom”.

- Restart screen, software launches automatically
- You must authorize ESwitch to access the system by pressing “Authorize”,
- If you wish to display the ESwitch menu, type the code “17934862”. If not, installation is complete. ESwitch automatically restarts the E-Box.
Restart
- Activate authorizations by going to “Settings”.
- Authorize the E-Box application.
- The software should launch and create its own serial number.
Screen on/off setting
- To do this, press the HOME button, then “Advanced Options”,“ Date Time”. Make sure that the “Auto sync” option is activated.
- You can then set the operating calendar(HOME, “Advanced Option” then “Calendar”). It is very important to select “Custom” in the calendar’s “Input ” menu.
You have now completed screen configuration. If you have other screens to configure, you can clone this configuration onto a USB key.

